
Flutter State Management: A Comprehensive Guide
2025-02-12 • Flutter, State Management, Bloc, Provider
Introduction
State management is one of the most critical aspects of Flutter development. As your app grows in complexity, handling state efficiently becomes essential for performance, maintainability, and scalability.
In this guide, we’ll explore different state management approaches in Flutter, compare their use cases, and help you decide the best one for your app.
Understanding State in Flutter
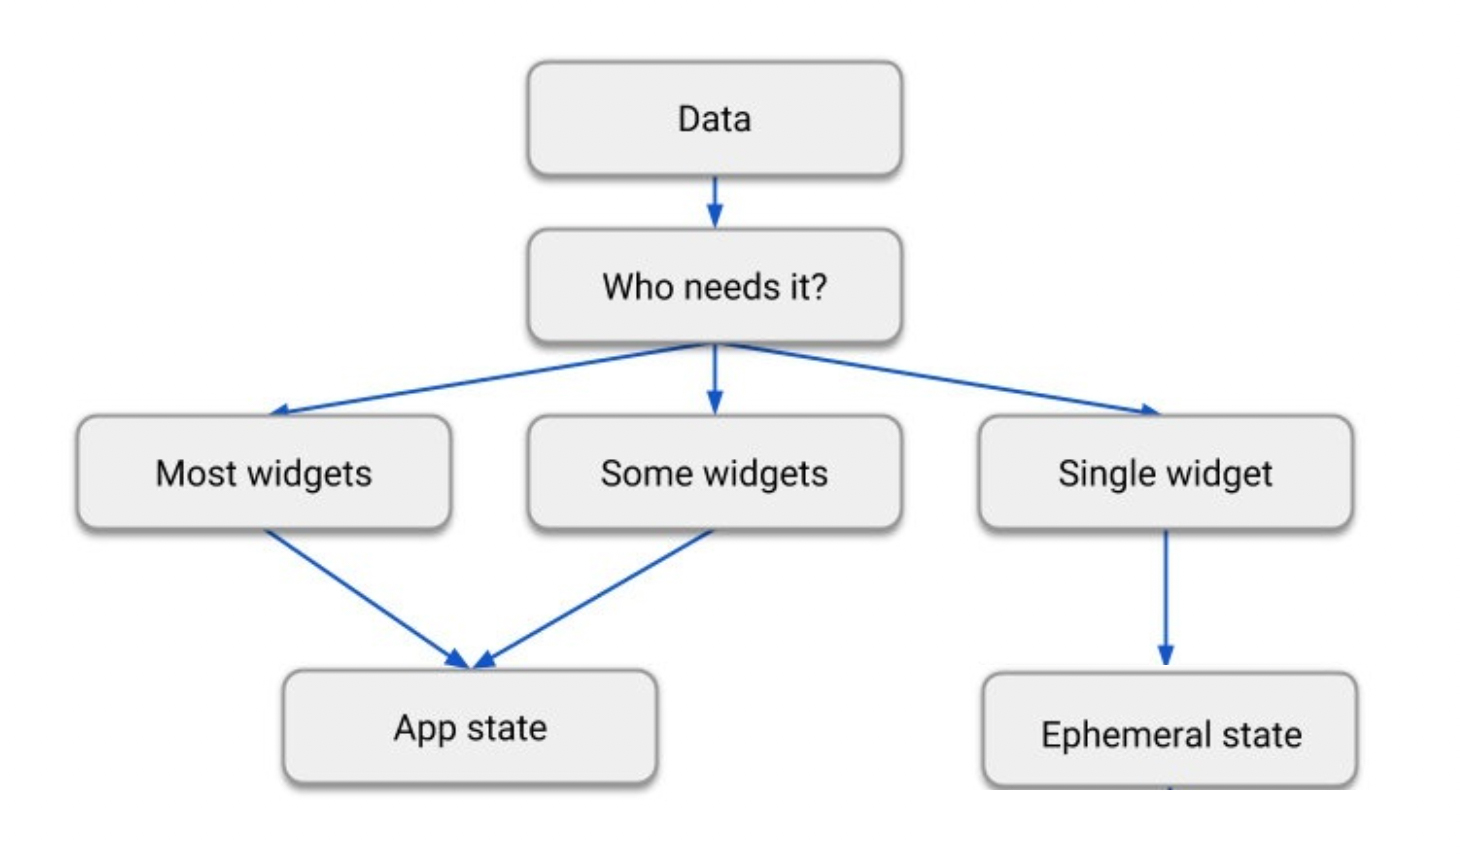
Flutter follows a reactive UI model, meaning that when the state changes, the UI rebuilds. There are two main types of state in Flutter:
- Ephemeral State (UI-only state) – This is temporary and local to a widget, such as animations, text field values, and UI toggles.
- App State (Shared state) – This state is used across multiple widgets or screens, such as user authentication, theme settings, and API data.
Popular State Management Approaches
1. setState (Built-in)
- Best for small, local state.
- Simple to implement but difficult to manage in large applications.
Example:
class CounterScreen extends StatefulWidget {
  @override
  _CounterScreenState createState() => _CounterScreenState();
}

class _CounterScreenState extends State<CounterScreen> {
  int count = 0;

  void increment() {
    setState(() {
      count++;
    });
  }

  @override
  Widget build(BuildContext context) {
    return Scaffold(
      body: Center(
        child: Column(
          mainAxisAlignment: MainAxisAlignment.center,
          children: [
            Text("Counter: $count"),
            ElevatedButton(onPressed: increment, child: Text("Increment"))
          ],
        ),
      ),
    );
  }
}
2. Provider (Recommended for Small-Medium Apps)
- Uses dependency injection to manage state.
- Cleaner and more scalable than
setState.
Example:
class CounterModel with ChangeNotifier {
  int _count = 0;

  int get count => _count;

  void increment() {
    _count++;
    notifyListeners();
  }
}
Usage:
final counter = Provider.of<CounterModel>(context);
Text("Counter: ${counter.count}");
3. Riverpod (Improved Provider)
- Eliminates
BuildContextdependency. - Better for global state management.
Example:
final counterProvider = StateProvider<int>((ref) => 0);4. Bloc (Best for Large-Scale Apps)
- Uses events and states to manage application logic.
- Suitable for enterprise-level applications.
Example:
class CounterBloc extends Bloc<CounterEvent, int> {
  CounterBloc() : super(0);

  @override
  Stream<int> mapEventToState(CounterEvent event) async* {
    if (event is IncrementEvent) yield state + 1;
  }
}
Choosing the Right State Management Solution
1. setState
- Best for: Simple UI changes.
- Complexity: Low, easy to implement.
- Performance: High, but not ideal for complex apps.
2. Provider
- Best for: Small to medium-sized apps.
- Complexity: Medium, easier than Bloc but more structured than
setState. - Performance: High, recommended for moderate state management needs.
3. Riverpod
- Best for: Scalable applications.
- Complexity: Medium, improves upon Provider with better reusability.
- Performance: High, offers fine-grained state control.
4. Bloc
- Best for: Large-scale applications requiring strict architecture.
- Complexity: High, requires more boilerplate but ensures maintainability.
- Performance: High, optimized for complex state management.
Conclusion
Flutter offers multiple state management solutions, each catering to different project needs. For small apps, setState or Provider is sufficient, but for complex applications, Riverpod or Bloc provides better scalability.
Still unsure which approach to choose? Experiment with different options and find what works best for your project!